Crusader: Difference between revisions
No edit summary |
No edit summary |
||
| Line 21: | Line 21: | ||
<h3>Fighter</h3> | <h3>Fighter</h3> | ||
* Crusaders are extremely vulnerable to crowd control effects. A good trick is to put at least one point into ''Censure'' so you can target yourself to break a [[Root]] | * Crusaders are extremely vulnerable to crowd control effects. A good trick is to put at least one point into ''Censure'' so you can target yourself to break a [[Root]] | ||
* Between ''All-Father's Shield'' and ''Blessing of the Healing Hands'', you can take excessive amounts of punishment | * Between ''All-Father's Shield'' and ''Blessing of the Healing Hands'', you can take excessive amounts of punishment, but don't let that lull you into dangerous situations. The crusader is especially unforgiving toward improper positioning. | ||
* ''Shield Bash'' is available only to Crusaders who carry | * ''Shield Bash'' is available only to Crusaders who carry [[shield]]s. Take this [[Stun]] into consideration when planning your character. | ||
<h3>Healer</h3> | <h3>Healer</h3> | ||
* ''Censure'''s damage is | * ''Censure'''s damage is decent, but outclassed by [[Prelate]] allies. It is best to build your character with a mix of meele and holy damage. | ||
* ''Sacrifice'' is the only healing effect that bypasses [[Assassin Powers#Shadow_Mantle|Shadow Mantle]]. This can save a an ally's life in a pinch. | * ''Sacrifice'' is the only healing effect that bypasses [[Assassin Powers#Shadow_Mantle|Shadow Mantle]]. This can save a an ally's life in a pinch. A Crusader built specifically for this contingency is called a "Sac 'Sader." | ||
* ''Benediction of Saint Lorne'' is one of the best group damage buffs in the game. Therefore, Crusaders compliment melee characters very well | * ''Benediction of Saint Lorne'' is one of the best group damage buffs in the game. Therefore, Crusaders compliment melee characters very well. | ||
| rowspan="3" | | | rowspan="3" | | ||
| rowspan="2" style="align: left; vertical-align: top;"| | | rowspan="2" style="align: left; vertical-align: top;"| | ||
Revision as of 16:49, 6 February 2018
|
| |||||||||||||||||||||||||||||||||||||||||||||||||||||||||||||||||||||||||||||||||||||||||||||||||||||||||||||||||||||||||||||||||||||||||||||||||||||||||||||||||||||||
|---|---|---|---|---|---|---|---|---|---|---|---|---|---|---|---|---|---|---|---|---|---|---|---|---|---|---|---|---|---|---|---|---|---|---|---|---|---|---|---|---|---|---|---|---|---|---|---|---|---|---|---|---|---|---|---|---|---|---|---|---|---|---|---|---|---|---|---|---|---|---|---|---|---|---|---|---|---|---|---|---|---|---|---|---|---|---|---|---|---|---|---|---|---|---|---|---|---|---|---|---|---|---|---|---|---|---|---|---|---|---|---|---|---|---|---|---|---|---|---|---|---|---|---|---|---|---|---|---|---|---|---|---|---|---|---|---|---|---|---|---|---|---|---|---|---|---|---|---|---|---|---|---|---|---|---|---|---|---|---|---|---|---|---|---|---|---|---|---|
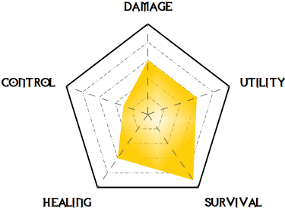
Though many roles are available, a Crusader can rarely do more than one at a time. A combination of meele and holy damage, while not chart-topping, is high enough to make a difference when combined with their support tactics. Fighter
Healer
|
| |||||||||||||||||||||||||||||||||||||||||||||||||||||||||||||||||||||||||||||||||||||||||||||||||||||||||||||||||||||||||||||||||||||||||||||||||||||||||||||||||||||||


Contributions by: Colest and Rewen in 2018
| Classes | |||||
|---|---|---|---|---|---|
| |||||