Difference between revisions of "UI Setup"
| Line 20: | Line 20: | ||
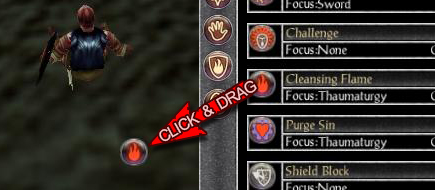
[[File:DragPower.jpg|center|Drag powers out for easy access]] | [[File:DragPower.jpg|center|Drag powers out for easy access]] | ||
== Key Binding == | == Key Binding == | ||
| + | {{Navbox | ||
| + | |header=Shadowbane Guides | ||
| + | |body={{Guides}} | ||
| + | }} | ||
Revision as of 08:10, 13 October 2014
The Shadowbane user interface is highly customizable. Every element of it may be moved, tweaked, or destroyed. There are even a bunch of supplementary windows you can add from the menu. The whole UI can be as basic or as complex as you like.
Contents
The Basics
Before you begin moving things to your liking, there is a setting you'll want to modify first. It's called Snap-To Grid, and it will keep everything lined up nicely.
- Enable the Snap-to-Grid: Press "Escape", click "Settings", click "Preferences". Move the Snap-To Grid slider at the bottom to adjust the size of the grid. A few pixels to from the left should be enough for most people.
- Move a UI Element: Shift + Click and drag
- Tweak a UI Element: Ctrl + Click
- Adjust transparency, key binds, or delete with the menu that appears.
Alternative Windows
In this section, you will explore two menu options: Windows and Character Info. Each has togglable extra or replacement windows for you to use.
Windows
Character Info
Dragging Minor Elements
Many windows will allow you to drag smaller elements out to become independant items. Try this with buttons, power cameos, status bars, and even things like emotes.
Key Binding
| Shadowbane Guides | |||||||
|---|---|---|---|---|---|---|---|
| |||||||
