Difference between revisions of "How To Make a Shadowbane Video"
Halethrain (talk | contribs) |
Halethrain (talk | contribs) m |
||
| Line 1: | Line 1: | ||
[[Category:Tutorials]] | [[Category:Tutorials]] | ||
== Foreword == | == Foreword == | ||
| + | I have created this tutorial in order to give you the ability to create a Shadowbane video. This is not a paint-by-numbers guide and does not always include specific instruction, especially in the editing process. There are many great resources available when it comes to video editing suites, so if you are having trouble with them google will be more than capable of assisting you. | ||
| + | |||
After reading the following tutorial you will have the knowledge to: | After reading the following tutorial you will have the knowledge to: | ||
Revision as of 13:07, 19 January 2008
Contents
Foreword
I have created this tutorial in order to give you the ability to create a Shadowbane video. This is not a paint-by-numbers guide and does not always include specific instruction, especially in the editing process. There are many great resources available when it comes to video editing suites, so if you are having trouble with them google will be more than capable of assisting you.
After reading the following tutorial you will have the knowledge to:
- Create a recording
- Play back the recording
- Capture the recording into a FRAPS video format.
- Edit the video
- Encode the video as a final product.
What You Need
Shadowbane: I suggest you copy and paste your entire Shadowbane directory during the "frapping" process your layout will change extensively. This will change the layout of your live character also, thus causing headaches from having to constantly fix your layout in-game.
Fraps: The program is not free. For you intrepid young scallawags I am sure you will find a way to "purchase" this program.
Video Editing Suite: Pick your flavor. Windows and Apple both come with bare bones movie makers. On the third-party side your best bet for Windows is Adobe Premiere Pro or Sony Acid Pro. With an Apple you'll be looking to get Final Cut Pro. All the above mentioned suites offer the same track-style non-linear editing. The third-party applications will simply allow you more advanced control with scene transitions and effects.
Music: It wouldn't be a very good video without tunes! Generally speaking faster pace works better. Everyone has their own preference in music, but I've historically preferred either great orchestrated chants for their epic grandeur, or Dance tunes such as The Chemical Brothers for a more modern sound.
Your Codec Flavor: Once you have completed your masterpiece the video will need to be encoded to make the file somewhat of a decent size to download. I am currently using the Windows Media 10 codec.
Step 1: How to Record
Starting a recording in Shadowbane is a simple process. Log-in to whatever account you wish to record with, go to the Actions option, and select "Recorder". This will open up a new dialogue box that allows you to enter the name of the recording and have both a record and stop button. Name the recording whatever you choose, press record when you wish to begin your recording, and stop when you wish to stop the recording. Recordings will all save to your Shadowbane directory in a folder labeled "Recordings"
There are, however, several things to note about recordings. First, you must keep in mind that recordings have been bugged for a long time and often break during playback shortly after beginning. There is no known exact cause of this issue, but it is generally recommended for you to not alt-tab or leave the Shadowbane window in any manner while a recording is in process. In addition it is best for recordings to be as short as possible. Some computers will not display all objects or players loaded on the screen. This is a sympton of the computer being overburdened by the game. Either turn down your graphical settings or buy a new computer. I find that it is best to have as many people record a battle as possible. This not only ensures you get working recordings, but also allows you, as an editor, to have multiple view points to create a video from. While this may not be important for an amateur editor, it will definitely be something you will want to utilize later down the road.
The second thing of note in a recording is that in a recording playback the game begins when the recording does. What this means is that all buffs, effects, stances, speech, damage, etc... will only begin to be recorded when you hit that record button. In a recording you will discover "artifacts" due to this, such as many characters attacking in normal stance, warping due to a run speed buff not being recorded, or characters dying with their health bar not at full. There is no way to avoid this completely and is generally just something you will have to learn to deal with.
The third and last important thing to note on recordings is that video direction begins here. Slapping together an edit of a random recording without any thought to the character it's been recorded from will typically result in what I call an "unfocused video". This kind of video will show an entire fight scene without giving the viewer direction to where the action is taking place on the screen. The character you've recorded from is generally very important. If you record from the perspective of a priest you'll probably find this character running away from the action, rather than into it. On the opposite end of the spectrum a heavy melee character (if on target) will always be exactly where the action is. I typically find that my preferred perspectives are from the Fighter class.
Step 2: Understanding FRAPS
FRAPS is a windows application that allows for the real-time video recording of DirectX and OpenGL software. In layman's terms this program will take anything you record with it and convert it into a special Audio Video Interleave (AVI) file using it's own propietary codec. It sounds complicated, but luckily the program is very intuitive and very user friendly.
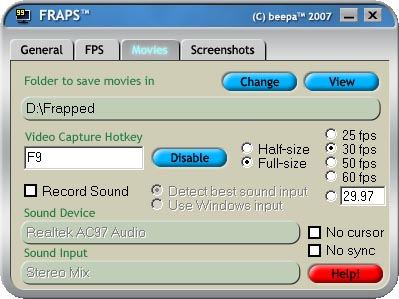
Once you have installed FRAPS you can open it from your start menu. The small screen will have several tabs along the top of it. For the purposes of this tutorial we will only be interested in the "Movies" tab as displayed on the right (Version 2.9.3). There are several options that you can pretty much pick to your liking:
- Folder to save movies in: This is where the newly created AVI file will be saved upon capturing it. It is recommended that it be saved to a different physical harddrive if possible. The ideal circumstances would be for the video to be stored on a physical harddrive that operates at 10,000 RPM. However, if none of those options are available save it anywhere convenient for you.
- Video Capture Hotkey: This is the hotkey that will begin and end the capturing process. You can set it to anything you like, but I typically leave it where it is.
- Record Sound: Checking this box will record the sound associated with Shadowbane, unchecking it will not. Since most people are sick unto death of the SB sounds I leave it unchecked.
- Half-Size/Full-Size: This will capture the video at the full resolution of your game, or at half of the resolution. Typically full-size will be more intensive on your computer and thus your frame rate.
- 25/30/50/60/Custom FPS: This allows you to set the frames per second the video will record at. I find the default 30 frames per second works just fine.
- No Cursor: Will not display your mouse cursor on the screen if checked. If unchecked will attempt to display cursor.
Step 3: Tweaking Shadowbane
Most people play Shadowbane on ridiculously low graphic settings in order to maximize their performance from the game. This is not the way you will want to capture a recording. What we're looking for graphically in a recording maintains the best possible graphics your computer can display while not putting your framerate below a steady average of 15-20 frames per second.
The fastest way to get Shadowbane running at a solid frame rate while retaining some of it's prettiness is by tweaking it using SBConfig.exe (located in your default shadowbane directory). Upon opening SBConfig.exe click on "Maximum Quality Configuration". This will set the game to it's highest quality settings. Second, go to the "Display" tab and set your resolution to what you will record at. Personally, I will never record over 1024*768, as the smaller the resolution the less of a hit to my frame rate. Third, in the "Graphics" tab where you see "Cache Meshes in Hardware" change the number 4096k to a larger number. This number signifies the amount of Video Card RAM being utilized by Shadowbane. 4096k is equal to 4mb. This means if you have a 256mb video card by default Shadowbane is using about 1.5% of it. You can play with the final number, but I typically keep it to about half of my 256mb video card size (131072).
Any additional settings changes are going to be based on your computer configuration. The better the computer you have the more graphics you can have cranked up. If you have a worse computer you will need to remove some of the graphical settings in order to maintain a good frame rate. I tend to turn uncheck all three shadow options. Lower end computer configurations can also enable the Performance Monitor which will systematically begin to remove graphics in-game when the frame rate drops below the set level.
Step 4: Playing Back and Capturing a Recording
So now that you have a basic understanding of the FRAPS window, it's time to capture your recording into video. To do this you open up Shadowbane, while having fraps running minimized, and instead of logging in you press the circular button located between Exit and Log-in. A dialogue will pop-up for you to enter your recording name. Enter the name of the recording you wish to playback and off you go.
Your recording will playback using the exact same User Interface as your character if it is a character you have setup an interface for. If it is not your character that you're playing back you will get the default interface. You of course do not want to have your entire interface opened when you capture a recording as it's drastically reducing your viewable space. This is a great time to utilize the transparency settings and the chat filters in Shadowbane. You'll find the most important things for every video to have is a killshot window, a mini-map, and a selection box. You can set up these windows as you like. I will provide a default "FRAP Skin" for you to download at a later date.
Once your layout is set you're finally ready to begin capturing video. When you're ready to capture hit the hotkey you've setup in FRAPS (F9 by default) and begin your direction. How you capture a fight is ultimately up to you, so I will only give sometips that I have found to be personally useful in this process:
- Make sure "Mouse Overs" are disabled in your preferences before recording. This can be done in-game (not in recording) or through SBConfig.exe. Disabling Mouse Overs prevents the character information from popping up when you hover your mouse over a toon.
- Holding in the middle-mouse button allows for free-look. I seem to be one of the few people to play using this, but using this method in a recording allows for great smooth camera motion without the jerkiness of keyboard or mouse-push methods. You can also zoom by using the middle scroll even when the middle mouse button is depressed.
- Don't be afraid to zoom in and out. Try not to be gratuitous with your zooming, but do not be afraid of it. A fight can quickly become stale if the camera stays at the same distance throughout the video.
- Review your recording thoroughly before capturing. On the fly capturing will almost always result in an unfocused or poorly focused video. The director needs to be fully aware of where the action is taking place, where the camera should be looking, and who is targeted in the HUD reticule.
- Write down a killshot list. In conjuction to the above, having an available list of who dies in what order allows you as the director to make sure the action is appropriately focused and the correct character is always targeted.
Step 5: The Editing Process
As mentioned at the beginning of this tutorial there are multiple video editing suites that you are able to use. Since I am trained in Adobe Premiere it is what I'll be primarily writing this tutorial for. I will however also give a tutorial on the default Windows Movie Maker.
Adobe Premiere Pro CS3
Creating a New Project
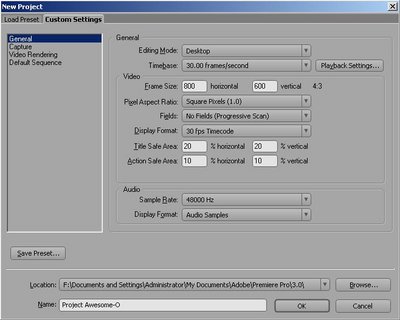
Upon opening Premiere the first window you'll see is you is your Project Management screen. This will allow you to open previous projects or create new ones. As this is a new project we will want to select the New Project button.At the next screen we will want to select the "Custom Settings" tab. (displayed on right). You will want to have the settings as such:
- Editing Mode: Desktop. Every other mode is intended for editing with physical cameras.
- Time Base: Leaving it at 30 frames per second is generally fine
- Frame Size: Whatever resolution you captured your recording at. This can be changed in the encoding process.
- Pixel Aspect Ratio: Square Pixels (1.0). This is very important or you may cut off parts of your video.
- Fields: No Fields (Progressive Scan). Computer monitors = Progressive!
- Display Format: Once again 30 frames per second is generally fine.
- Title Safe Area: Default is fine. This puts up borders to show you where text should go. For more information check out wikipedia's entry on Safe Area
- Action Safe Area: Default is fine. More information at same link as above.
- Audio: Default is fine. This can be changed during the encoding process.
- display Format: Default.
- Name: Put in a name for your project
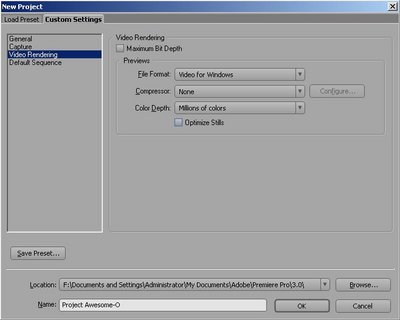
- Maximum Bit Depth': Unchecked
- File Format: Video for Windows
- Compressor: None. We will worry about encoding later.
- Color Depth: Millions of Colors
- Optimize Stills: Uncheck.
Now that we are done with the settings for our video it's best to save them as a preset to avoid repeating this later. Just click the Save Preset button and make a name for it. Once you've saved a preset feel free to click the OK button and open up your project.
The Project Window
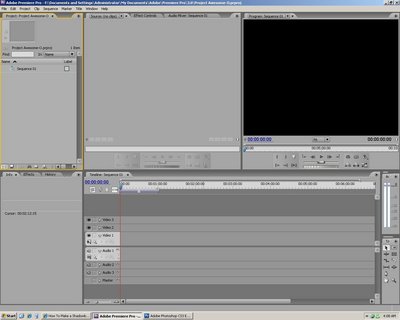
You'll now find yourself in your main Project Window. This window is where the magic of the editing process takes place. So lets take a look at each part of the Project Window in further detail working counter-clockwise from the top-left:
- Project Bin: (top-left) Your project bin will contain all the media you decide to associate with this project. This ranges from your captured recordings, the music you choose, any pictures you might use, and all the way to any text titles you may add. Adding media to this bin is as simple as dragging and dropping it in or by right-clicking inside the bin and going to import.
- Info/Effects/History: (bottom-left) This three-part dock has three very different purposes. Info will display any information about the selected media along with other details. The effects section contains all the effects and transitions, such as fades. Effects and Transitions are applied by dragging and dropping them directly onto your clip in the timeline. And lastly, the history will show a history of changes allowing you to undo multiple changes at once.
- Timeline: (bottom) The timeline is where you will place your media files. By default you have 3 video and audio tracks. These work as layers. If you have media on Layer 2 it will be on top of any media on Layer 1. This should come naturally to anyone familiar with Adobe Photoshop. Using this timeline you can cut up and arrange the video in any method you want.
- Tools: (bottom-right) Tools are what you will use to manipulate media on the Timeline. The selection tool will allow you to drag-and-drop videos to different locations, change their length, manipulate video transitions, and so forth. The only other tool of great importance is the Razor tool which will allow you to cut your media into different pieces.
- Audio Master Meter: Will display your audio levels.
- Video Display: (top-right) This is where your timeline can playback video on demand. Once you have a general video in your layout hit play and see how it looks. Most effects and transitions will even show in real-time in this window allowing you to time transitions and effects greatly to music.
- Source/Effect Controls/Audio Mixer: (top) The last window is another multi-purpose window. The window will allow you to preview your media. By double-clicking your media in the bin it will appear in the source window. Given that your recordings are mostly one giant video file the source window doesn't typically get too much use for a Shadowbane video. The Effect controls is where you can control the variables of any video effects you may apply. Lastly, the audio mixer is for changing the levels of your audio.
Laying Out & Titling Your Movie
So now that we have an understanding of the basic layout of Adobe Premiere we can finally take our captured recording and make a movie out of it. The way I've laid out these steps may not be the most fluid, it's just the best way I can explain the entire process without getting into too many consuming details too early. The first step to doing this is as simple as locating the place you captured your recording to with FRAPS and dragging it into your bin. The second part is actually one of the hardest and most important parts and that's finding the perfect song for your video. It's an insurmountable task to find a song everyone will love but keep in mind that a song for your shadowbane video should be no different from a song in a great movie. In general you should be looking for something that creates excitement. As I mentioned in the first section of the tutorial epic and/or face-paced songs tend to work great with Shadowbane videos. Once you've selected a song just drag and drop it into your bin.
So you have a bin with your captured recording and song. To start it off just drag your recording to Video Track 1 and your audio to Audio Track 1. Most of the time you'll find that your song isn't nearly as long as the video. Don't start freaking out and selecting another song just yet. The beauty of the editing process is that a lot of the video may end up on the cutting room floor. However, before you even get started on cutting up your video, you may want to make a title first. Generally speaking it's best to keep your introduction roll between 5 and 20 seconds. Any longer than that and you're just going to bore your viewer. To create titles you need to go to File > New > Title. From here name your title and click OK. You'll now have a Title Creation window opened. It's up to you to create something that you believe is appealing. It's more than likely your first attempts won't be great, but don't worry about it, you're new at this. Don't be afraid to create multiple titles for multiple words. This can give you greater control over editing how the titling appears during your edit.
Once you've created your title it will automatically add to your bin. You have a couple options on what you can do from this point. You can use a title to overlay your movie or use it to precede the movie. In either case I tend to keep titles on Video Track 2 in order to keep things neater.
Now you have your title, your video, and your audio. Technically you have the complete formula for a movie.
The Cutting/Tweaking Process
The cutting and tweaking process can be the most time consuming part of your project. It is also the part that truly defines someone that makes great Shadowbane videos from someone that just throws something together.
The first thing I look for when I begin to cut up a video is actually not something I look for at all - it's something I listen for. The absolute best way to turn an average video into a superb one is to cut to the beat of the music. Not only does this enable you to get rid of parts of your video that may be unimportant/boring, it gives the video a very professional vibe. There are several ways that you can do this:
- Speed up your video. Shadowbane seems to be a decently fast game when you're playing it in real-time, but you can speed it up by nearly 200% depending on the music you've selected. Doing this can cut your overall length by up to 50% and actually help match your video to your beat tempo. You can speed up your video by right-clicking a clip and going to Speed/Duration.My Video Example
- Match your cuts to audio beats. When you start using the razor tool to cut your movie up try and make every single cut (scene change) fall on the beat of the song. To really get your wits around this concept can take some time, but it's well worth it in the long run. Don't be afraid to slightly speed up or slow down small parts of your video so you can make your cut land perfectly. My Video Example
- Your titles are part of the movie. Don't have a title just sitting in the front of your movie like a wet blanket. A title is the first thing people see. If a title just pops at them it can actually get them in the mood for the movie. Don't be afraid to tinker with the video transitions to see what you can come up with. My Video Example
- Less is often more. Over the years of working in video editing I've discovered that the Video Effects are largely a staple of amateur video making. Aside from some of the video mastering effects it's best to stay clear from video effects. My Video Example


