Difference between revisions of "Aethos' UI Guide"
| (4 intermediate revisions by the same user not shown) | |||
| Line 5: | Line 5: | ||
:<code>ESC</code> [[File:Rarrow.png|baseline|9px]] <code>Windows</code> [[File:Rarrow.png|baseline|9px]] <code>Load Layout</code> [[File:Rarrow.png|baseline|9px]] <code>AdvancedLayout@Ardan</code>. | :<code>ESC</code> [[File:Rarrow.png|baseline|9px]] <code>Windows</code> [[File:Rarrow.png|baseline|9px]] <code>Load Layout</code> [[File:Rarrow.png|baseline|9px]] <code>AdvancedLayout@Ardan</code>. | ||
| + | |||
| + | Now, we'll begin applying the finishing touches to your new layout. | ||
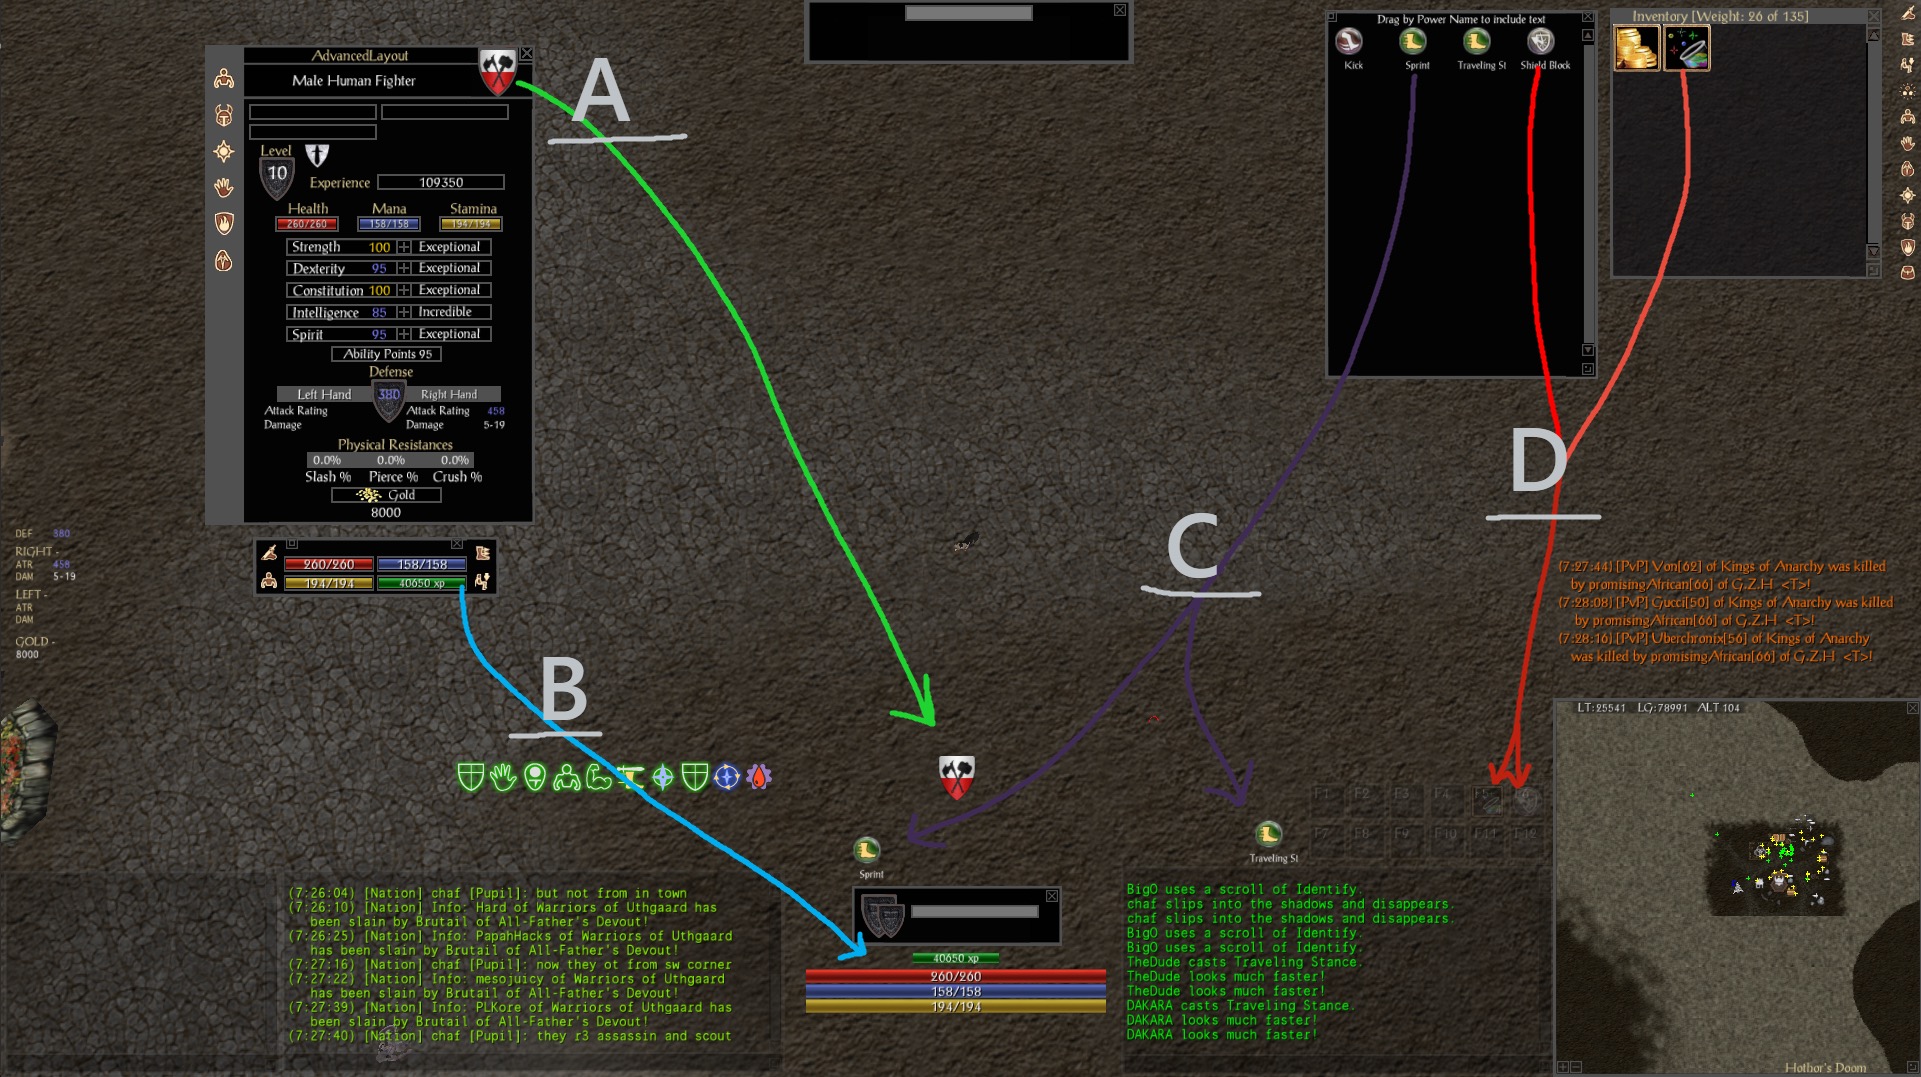
[[File:Aui1.JPG|400px|thumb|Fig. 1]] | [[File:Aui1.JPG|400px|thumb|Fig. 1]] | ||
| + | :'''A:''' Start by opening your character's stats screen (default hotkey <code>s</code>). Click and drag your guild crest out onto the UI - any place you'd like to display it since the crest is aesthetic only. If you release the crest in the wrong location then it, like all elements of the UI, may be freely moved by shift-left click and holding. | ||
| − | + | :'''B:''' Open your character's status bar window. This is located under the "windows" tab of the in-game Esc menu. Left-click and drag the green experience bar onto the UI as you see fit. | |
| − | + | :'''C:''' Open your VPowers window. (Vengeance UI modified window containing all the character's spells and skills.) By default, this is reached via <code>Esc</code> [[File:Rarrow.png|baseline|9px]] <code>Vengeance UI</code> [[File:Rarrow.png|baseline|9px]] <code>VPowers</code>. Left-click and drag any spell or skill onto the UI as you see fit. | |
| − | |||
| − | |||
| − | |||
| − | + | :'''D:''' Open your inventory. By default, this is bound to "i". Left-click and drag any potions from your inventory or additional spells or skills from your VPowers menu. Note, that even multiple potions will only use one hotbar slot. | |
=== Character Info Tweaks === | === Character Info Tweaks === | ||
We shall continue the customization process by adding some at a glance character information and setting up our group window. Then, we'll learn to move various UI elements and resize them. | We shall continue the customization process by adding some at a glance character information and setting up our group window. Then, we'll learn to move various UI elements and resize them. | ||
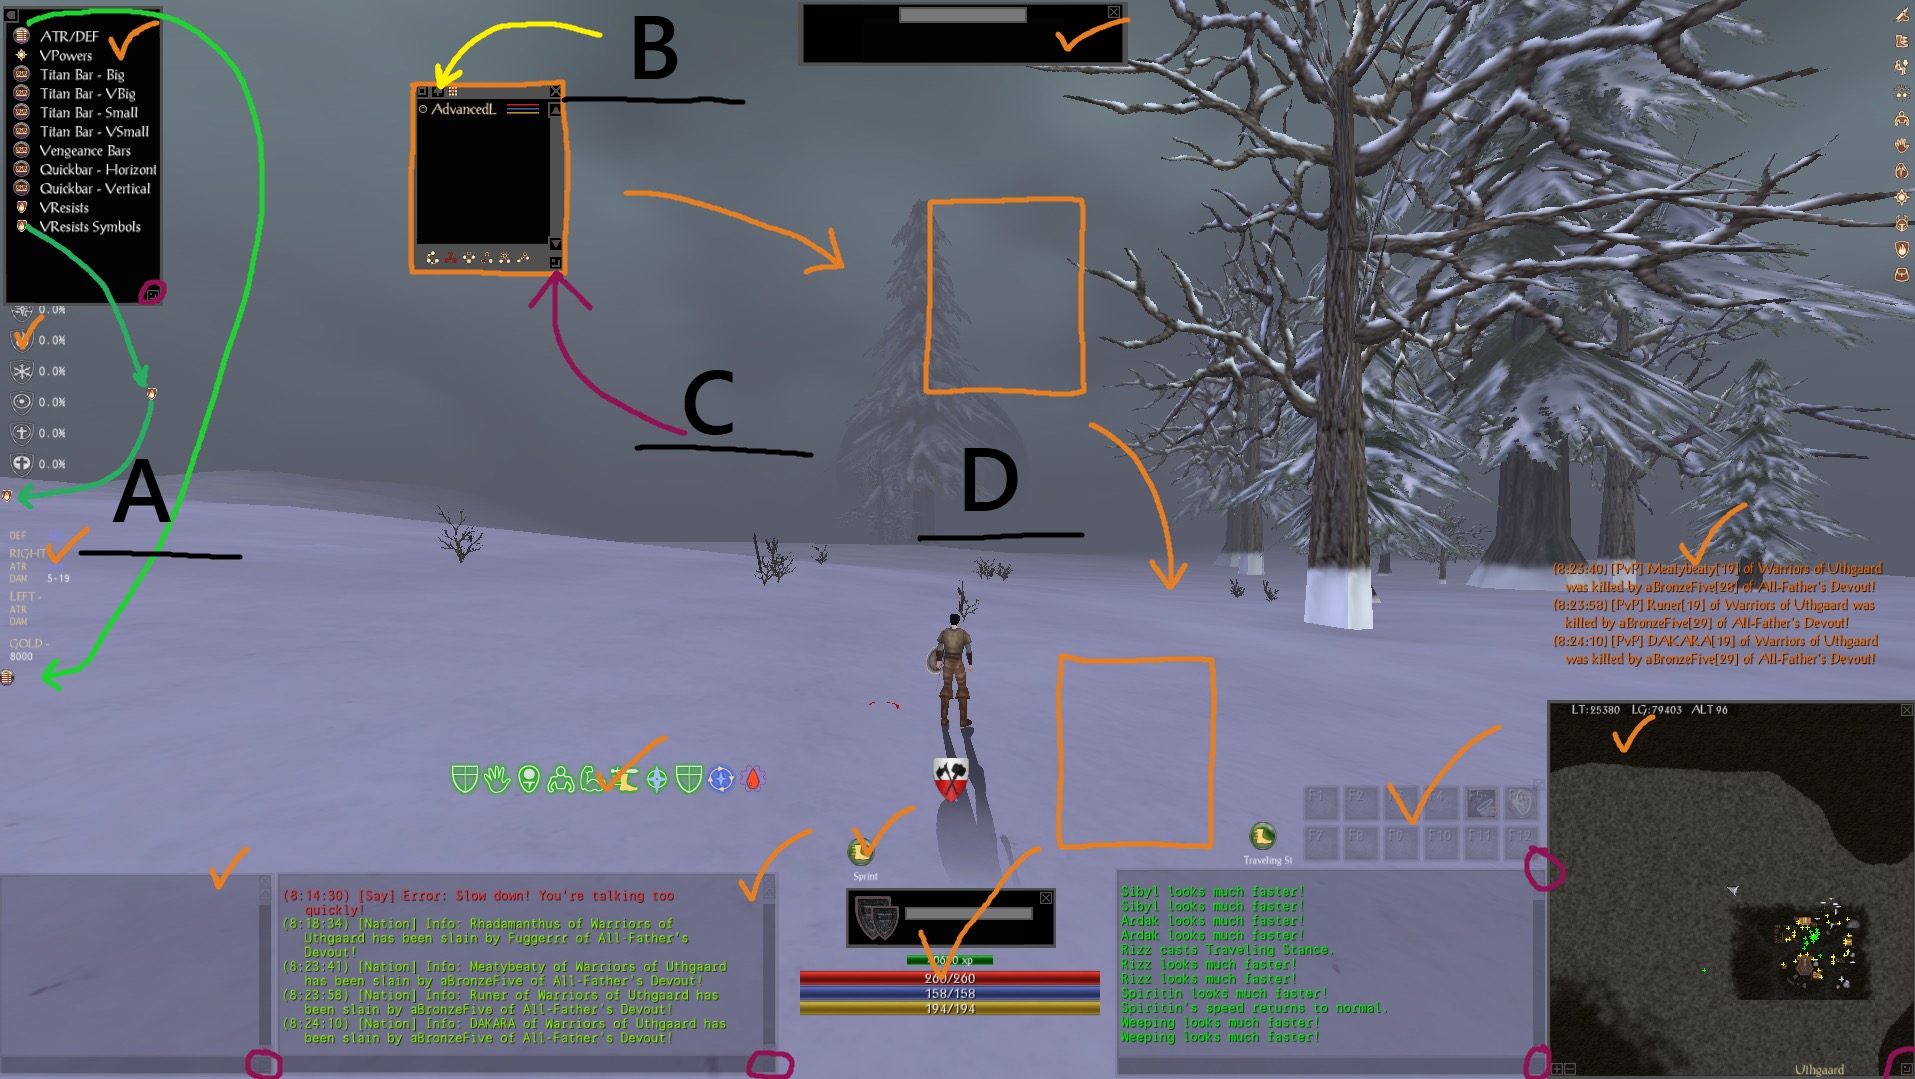
| − | + | [[File:Aui2.JPG|400px|thumb|Fig. 2]] | |
| − | + | :'''A:''' Start by opening the VengeanceUI menu. By default (only after loading VengeanceUI) this is in the in-game esc menu. Begin at the top of the menu by left-click and dragging the "ATR/DEF" button and placing it on your interface. Next, at the bottom of the list, left-click and drag the "VResists Symbols" or "VResists" button onto your interface. (If the button seems to disappear en route - place it first in a close location before moving via shift-click and dragging.) | |
| − | + | ||
| − | + | :'''B:''' Next, enter without quotations, "/inv me" (My personal preference for quickly forming a group - "Me" is to short to be a player name but the command creates a party regardless.) in any in-game chat box. This will open a compact group information window. Finally, click the upwards-facing arrow icon to maximize your group window and place it wherever you will. | |
| + | |||
| + | :'''C:''' The resize button can be located in the bottom right of all windows with the function. | ||
| + | |||
| + | :'''D:''' Take a moment to shift-click and drag any menu or window around the UI. Note that all elements of the UI marked by the orange checkmarks (and more!) also function this way. | ||
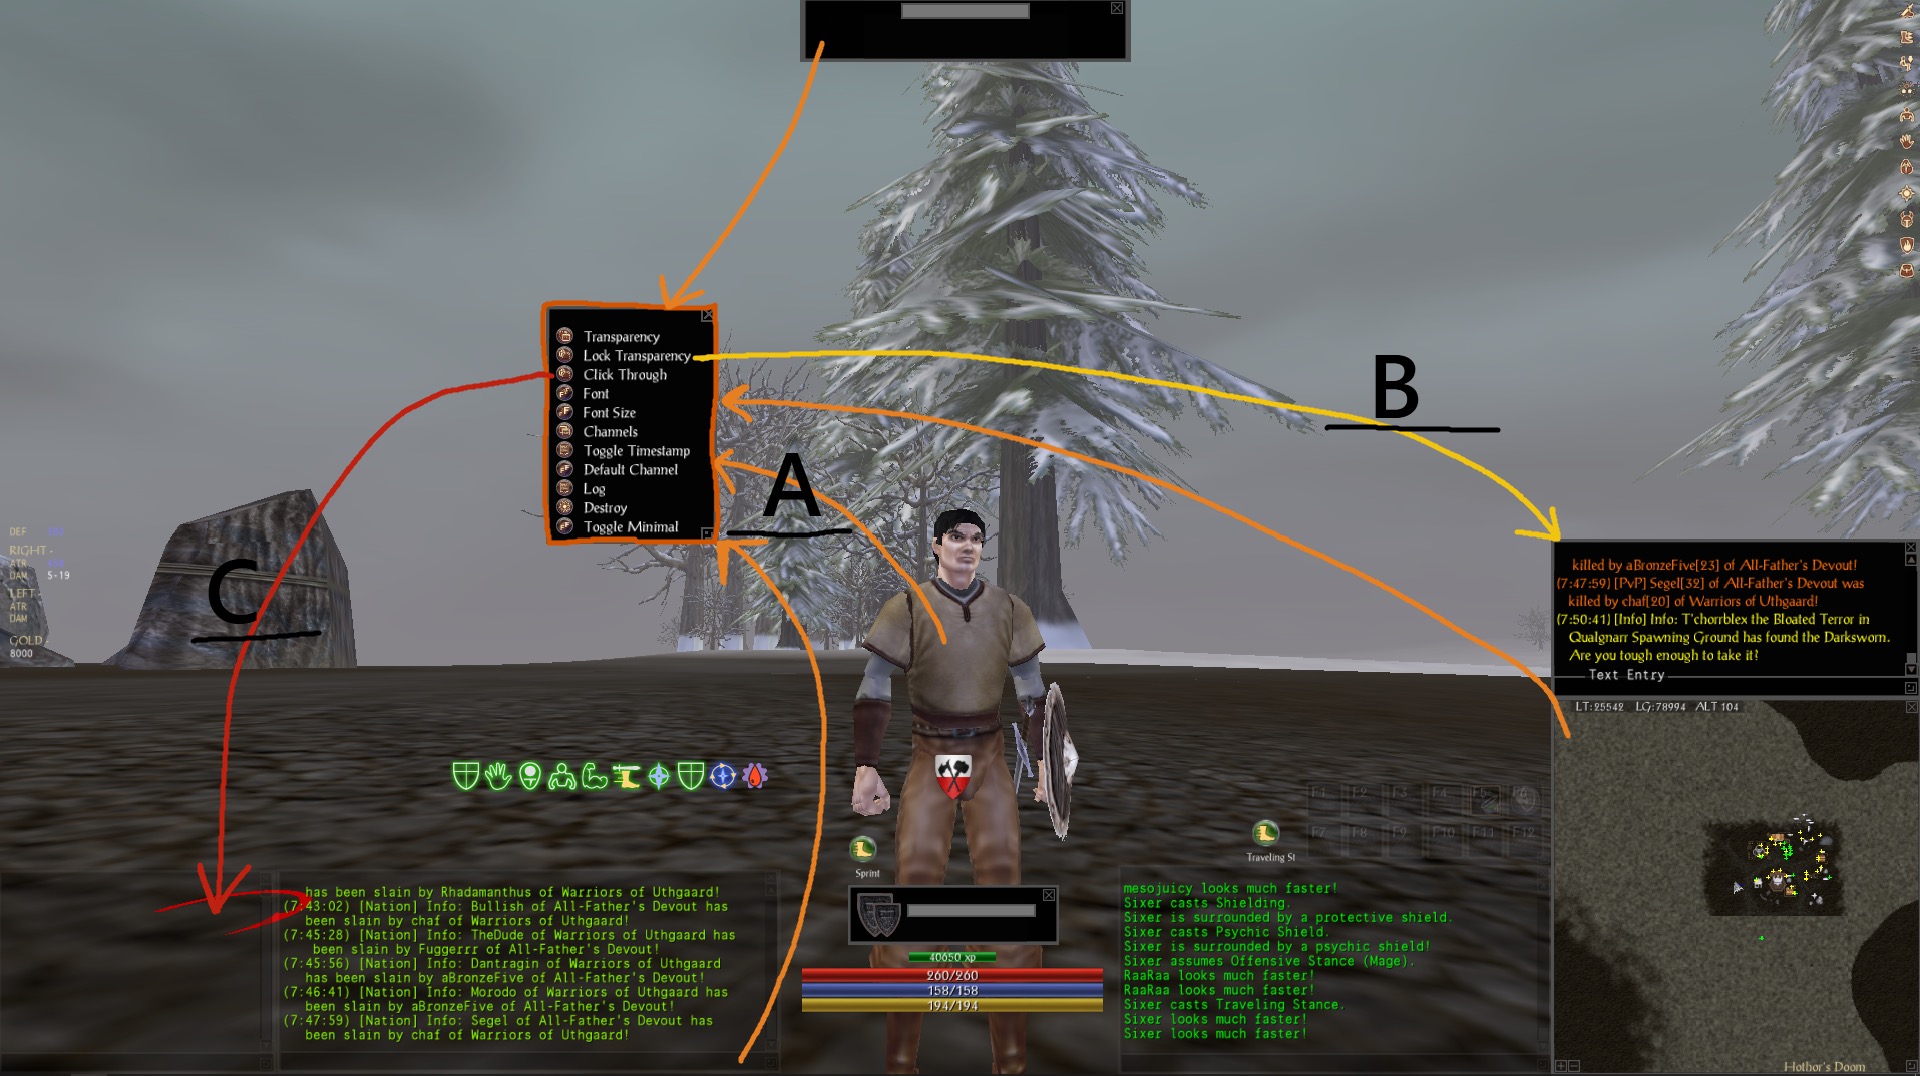
[[File:Aui3.JPG|400px|thumb|Fig. 3]] | [[File:Aui3.JPG|400px|thumb|Fig. 3]] | ||
| Line 30: | Line 34: | ||
We will finish up with a few tips for interacting with the various UI elements. | We will finish up with a few tips for interacting with the various UI elements. | ||
| − | + | :'''A:''' The menu highlighted in Figure 3 in orange is a Ctrl-click menu. Most every element of the game both the UI and in-world can be interacted with via a Ctrl-click menu unique to the object. Try Ctrl-clicking various elements of the UI and even your own or other characters to see how it functions. | |
| − | + | ||
| − | + | :'''B:''' "<code>Lock Transparency</code>" will keep your transparency setting even when your mouse is hovered over the element. | |
| + | |||
| + | :'''C:''' "<code>Click Through</code>" will allow you click your mouse through something without interacting with it directly. When this option is used, only the tiny options and resize buttons will remain interactive. This can be problematic when combined with the above, which will make it difficult to find the options button. | ||
== Author's Notes == | == Author's Notes == | ||
Latest revision as of 14:43, 15 January 2018
This walk-through will also function as a primer - teaching you how to manipulate and customize most aspects of Shadowbane's UI for your own layouts.
Importing and Customizing
Used for this primer will be the "AdvancedLayout" found natively in the game. To apply it, simply go through the in-game menu:
Now, we'll begin applying the finishing touches to your new layout.
- A: Start by opening your character's stats screen (default hotkey
s). Click and drag your guild crest out onto the UI - any place you'd like to display it since the crest is aesthetic only. If you release the crest in the wrong location then it, like all elements of the UI, may be freely moved by shift-left click and holding.
- B: Open your character's status bar window. This is located under the "windows" tab of the in-game Esc menu. Left-click and drag the green experience bar onto the UI as you see fit.
- C: Open your VPowers window. (Vengeance UI modified window containing all the character's spells and skills.) By default, this is reached via
Esc
Vengeance UI
VPowers. Left-click and drag any spell or skill onto the UI as you see fit.
- D: Open your inventory. By default, this is bound to "i". Left-click and drag any potions from your inventory or additional spells or skills from your VPowers menu. Note, that even multiple potions will only use one hotbar slot.
Character Info Tweaks
We shall continue the customization process by adding some at a glance character information and setting up our group window. Then, we'll learn to move various UI elements and resize them.
- A: Start by opening the VengeanceUI menu. By default (only after loading VengeanceUI) this is in the in-game esc menu. Begin at the top of the menu by left-click and dragging the "ATR/DEF" button and placing it on your interface. Next, at the bottom of the list, left-click and drag the "VResists Symbols" or "VResists" button onto your interface. (If the button seems to disappear en route - place it first in a close location before moving via shift-click and dragging.)
- B: Next, enter without quotations, "/inv me" (My personal preference for quickly forming a group - "Me" is to short to be a player name but the command creates a party regardless.) in any in-game chat box. This will open a compact group information window. Finally, click the upwards-facing arrow icon to maximize your group window and place it wherever you will.
- C: The resize button can be located in the bottom right of all windows with the function.
- D: Take a moment to shift-click and drag any menu or window around the UI. Note that all elements of the UI marked by the orange checkmarks (and more!) also function this way.
Tips
We will finish up with a few tips for interacting with the various UI elements.
- A: The menu highlighted in Figure 3 in orange is a Ctrl-click menu. Most every element of the game both the UI and in-world can be interacted with via a Ctrl-click menu unique to the object. Try Ctrl-clicking various elements of the UI and even your own or other characters to see how it functions.
- B: "
Lock Transparency" will keep your transparency setting even when your mouse is hovered over the element.
- C: "
Click Through" will allow you click your mouse through something without interacting with it directly. When this option is used, only the tiny options and resize buttons will remain interactive. This can be problematic when combined with the above, which will make it difficult to find the options button.
Author's Notes
This primer was created in the hopes that it would allow players to have a more feature complete and modern enough version of Shadowbane's UI that they actually know how to use. The hope being that said players then will also gain the required tools to adapt their UI to fit their personal tastes.
| Shadowbane Guides | |||||||
|---|---|---|---|---|---|---|---|
| |||||||


